This web browser either does not support JavaScript, or scripts are being blocked. To find out whether your browser supports JavaScript, or to allow scripts, see the browser's online help. Please enable JavaScript in your browser settings so you can get the most out of Eagle Lake Woodworking.

Eagle Lake Woodworking is your source for woodworking projects and videos.

Currently rated 4.0 by 33 people

  • Currently 3.969697/5 Stars.
  • 1
  • 2
  • 3
  • 4
  • 5
Project Picture
Watch The Video

Watch The Video

Check out the action!
Watch in High Quality
Browse this projects Files

Browse this projects File

There are 3 files in this project available for download

Project Description

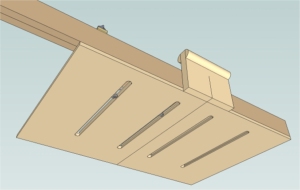
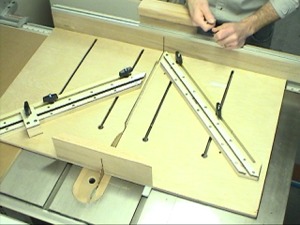
The Super Sled combines two of my best shop jigs!


I love my original crosscut sled, so when you (the viewers) asked me to make a video about how to make that sled, I started to think of ways to improve upon the existing design.


I regularly use two different sleds in my shop:
1. My crosscut sled which I use mainly for crosscutting, and cutting shoulder cuts on tenons.
2. Wood Magazines Universal Tablesaw Jig which I use exclusively for mitering.


While contemplating ways to improve on the design of my crosscut sled, I started to focus on the concept of combining the two sleds. I spent a lot of time modeling the new Super Sled in Google Sketchup and I feel I have come up with one of the most versatile crosscut / mitering sleds around. When you see the video for the construction of the sled, I think you'll be surprised at how easy it is to build for yourself!


The video for how to build the Super Sled will be filmed later this month (Feb 2009)


Crosscutting
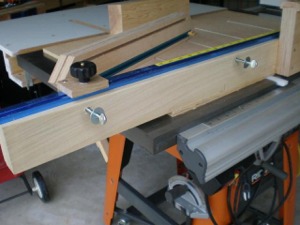
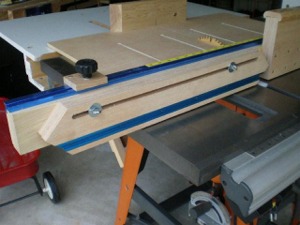
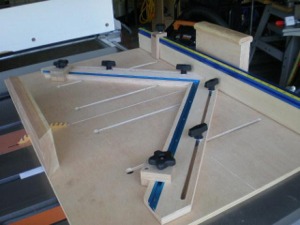
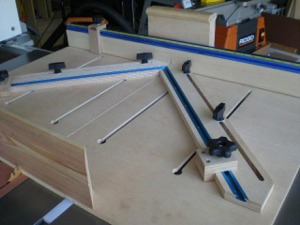
The Super Sled has all the benefits of my original crosscut sled, including a t-track for adjustable stop blocks. The new sled uses a flip stop, so you can keep the stop in the same place, but flip it up out of the way to make other cuts in between.

With generous capacity to the left and right of the saw blade, the Super Sled can handle just about any crosscut. The main fence is extended out farther on the left side of the blade allowing you to use the flip stop for long cuts.
Mitering
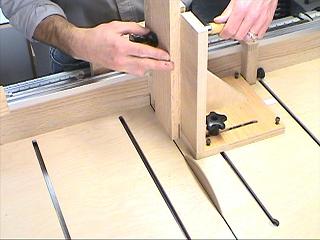
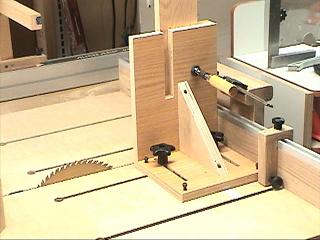
I really love mitering with Wood Magazines Universal Tablesaw jig which is why I wanted to incorporate all the features of this jig into the Super Sled. The Universal Tablesaw jig needs to be switched from one side of the blade to the other when doing complementary miters. With an identical setup on both sides of the blade, you can easily miter on either side of the blade.

The fence used for mitering has a t-track for mounting a stop block or hold downs and can be positioned any where from 0 to about 70 degrees.
Versatility
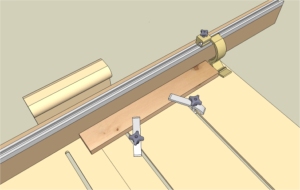
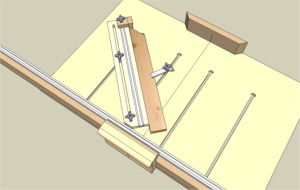
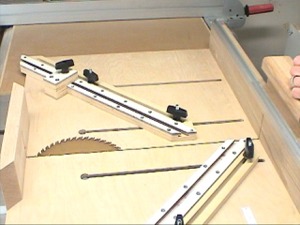
I designed the Super Sled with versatility in mind. The four slots in the main board of the fence function the same as t-tracks, and allow for the inclusion of stop blocks, the miter fence, and other add-on jigs like a tenon or box joint jig.

The main board for the super sled is 1/2 inch plywood. I went with 1/2 inch plywood so I wouldn't loose very much blade height capacity. The four slots in the main board are 3/8 inch wide from the top, and have a 3/4 inch wide shallow recess in the bottom and will accomodate a standard 5/16 inch t-bolt.


Update - 3/22/2009: There are now two Accessory videos available. The Stop Block and the Tenon Jig have been added to the video collection.


Tenon Jig Tenon Jig


Update - 4/05/2009: Mitering Fence Video Released - The latest video in the Super Sled series shows the construction of the fence and two different kind of stop blocks. The setup process for mitering with the fence is also shown.


Tenon Jig Tenon Jig


A friend of Eagle Lake offers some Super Sled improvements: Bob McCormick came up with two great suggestions for improving the usability of the Super Sled. The first suggestion was a great find - a right angled t-track that has a t-track on the top and a second t-track at a right angle to the first. Bob mounted this t-track to the main rear fence after cutting a rabbit. Having a a t-track on the top and face of the fence opens up some nice possibilities for mounting accessories.


Tenon Jig Tenon Jig

The second improvement Bob came up with is great - he designed a simple solution to stow the miter fences on the back of the main fence. He installed some threaded inserts into the back of the main fence where he can mounted the miter fences by using a thumbscrew to hold it in place.


Tenon Jig Tenon Jig

Comments

8/24/2010 10:01:01 PM
Canada
Posted by:
Hi John,

I have several sleds that are built for making different cuts. My crosscut sled probably sees the most use, and the others, such as my 45 degree miter sled are always ready to perform their duties without the need for any set-up or adjustments. I find having dedicated sleds saves me a lot of time.

That being said, for those that don't mind adjusting for various cuts, your design is very versatile. It would certainly cover most cuts the average woodworker would need to make.

Well done.

Rick
7/26/2010 5:20:04 PM
Canada
Paul Elshoff
Posted by:
Hi John.

I have GOT to build myself one of these!  Thanks!  I got the link from LJ.

Paul "BigTiny" Elshoff
5/22/2010 7:16:34 PM
United States
Posted by:
Reply to comment from Kevin who wrote:
John

Nice sled and great videos.  Being a novice woodworker, I am still trying to get a handle on...


Hi Kevin,
You could certainly use a few pieces of plywood laminated together for the main fence.  When hardwood is properly dried and then milled true, it shouldn't warp or twist.   When wood expands and contracts with seasonal movement, it's generally across the face of the board.  
About the small fence piece at the leading edge of the sled, I think it's a terrific idea to make it removeable.  You just need to be careful when mounting and unmounting the sled without the leading fence piece affixed.  Other than that, I think it's a really good enhancement to the super sled!  Thanks!
John
5/4/2010 12:18:12 PM
Canada
Kevin
Posted by:
John

Nice sled and great videos.  Being a novice woodworker, I am still trying to get a handle on wood movement, but it seems to me that any type of hardwood would become untrue as the weather changes.  Do you find this to be an issue and why wouldn't you make the fence out of 2 or 3 strips of glued up 3/4" plywood for more stability?  You could even veneer the plywood for appearance.

Lastly, does the strip on the other end of the sled offer any value other than keep the two halves connected?  I was thinking of making that strip removable once the sled in the miter slots, which would allow me to cut larger blanks.

Kevin
4/26/2010 6:44:57 AM
United States
Posted by:
Reply to comment from Will Stokes who wrote:
Just thought I'd let you know I built one for myself and love it. I made a few minor modifications:
...

Will, I took a look at your Sled on Lumberjocks, and commented there.  You did a great job on the sled!  It's a really nice looking jig and I'm sure you like how useful it is.  Thanks for posting the link to your LJ project.
John
4/26/2010 6:42:43 AM
United States
Posted by:
Reply to comment from Shawn who wrote:
Instead of threaded inserts and thumbscrews on the back of the fence, I think I might route a couple...

I think that's a great idea Shawn!!
4/25/2010 1:42:42 PM
United States
Shawn
Posted by:
Instead of threaded inserts and thumbscrews on the back of the fence, I think I might route a couple keyhole openings then I can just leave the t-bolts on the miter fence.  Insert them into the keyhole, then tighten them down.
4/10/2010 11:13:36 AM
United States
Will Stokes
Posted by:
Just thought I'd let you know I built one for myself and love it. I made a few minor modifications:
-I embedded the t-track into the fence. I like this better but it's really personal preference.

-I recessed the screws holding the handle into the fence etc. and covered up the screws with walnut plugs. Walnut on cherry just made it look a bit nicer.

I have yet to make the extension flip stop, something to do when the need arises. For now I'll mostly be using the sled for cross cutting. I'll probably build a tennoning jig for this eventually as well, we'll see.

lumberjocks.com/projects/30609#comment-645888
4/9/2010 4:14:20 PM
United States
Posted by:
Reply to comment from Tony who wrote:
John,

fence extending to the left, is that because you have a right tilt saw ...

Hi Tony,
There is no reason at all why you can't have the longer side to the right.  You could even extend both sides.  I chose to make the left side longer because I have more space on my tablesaw on the left side.  No other reason than that.
John
4/2/2010 7:06:29 AM
United States
Posted by:
John,

Great sled, appreciate the effort to produce the video's etc..

Question regarding the fence extending to the left, is that because you have a right tilt saw ?  Is there any particular reason the fence couldn't extend to the right ?

Thanks
tmcg
3/4/2010 6:52:36 AM
United States
Posted by:
Reply to comment from Jim who wrote:
Separate question..  Can you cut the metal t-track with the table saw blade?  It looks  like some of...

Hi Jim,
You can definitely cut the aluminum on the tablesaw with a carbide blade.  I have cut aluminum using this method many times.  Aluminum routes very well too; you just have to take it slow with shallow passes.
I'm not recommending that you cut the t-track with your $120 Forrest II blade.  Dig up an old one.  To be honest with you though, I've had the same blade in my saw for a while now (Freud Diablo), and I've cut aluminum with it and it's still nice and sharp for wood.
3/4/2010 3:53:08 AM
United States
Jim
Posted by:
Separate question..  Can you cut the metal t-track with the table saw blade?  It looks  like some of those miter setups were cut with the t-track in place?  Will that kill the blade or is the aluminum soft enough?

Thanks,

jim
3/3/2010 10:57:54 PM
United States
Paul Wash
Posted by:
Reply to comment from Jim who wrote:
Reply to comment from Paul Wash who wrote:
Word of advice for anyone building the sled...I ended up...


I had to cut them myself - our store is Woodcraft here in Richmond, VA and they thought I was "crazy" for asking for pre-cut ones that fit standard miters. So I cut them at ~.72". I tried various larger sizes 3 times and this was the best fit. There is no play side to side and it slides well. I also pre-drilled the material to clean it out of the counter sinks. The pre-drilling seemed to really help b/c otherwise there is no place for the material to go when straight up screwed except for side to side. I installed a screw at every 2 inches on the left runner. For the right I had to back out a few in the middle b/c it was still compressing too much.
3/3/2010 2:29:32 PM
United States
Jim
Posted by:
Reply to comment from Paul Wash who wrote:
Word of advice for anyone building the sled...I ended up using #6 5/8" screws b/c anything greater was permanently flaring the UHMV plastic enough to make the sled slide poorly....

What was the actual width of the strips?  The 3/4" strips from peachtree actually ended up being .742"  This gave me lots of play.  Peachtree said that it was purposely milled undersize.  But that seems too much.  think they sent me the sears version by mistake which is supposed to be .744"  They said that the strips would widen as the screw compressed the material.  Which it did on a test piece.. almost taking out all the play..  But I had to really tighten it down.  I ended up using some oak strips that I made.  Now there is no play.  Almost too much so as the sled sticks in the front and the back but slides nicely in the middle of the table.  I wonder if my miter slots aren't exactly parallel! Smile
3/2/2010 10:38:29 PM
United States
Paul Wash
Posted by:
Thanks John I switched to the 1/4 inch runner material and cut the dado accordingly. The table board is nice and flat on the saw top. I actually had quite a time with the runners if you can believe it.

Word of advice for anyone building the sled...I ended up using #6 5/8" screws b/c anything greater was permanently flaring the UHMV plastic enough to make the sled slide poorly. It wasn't even visually detectable but enough to cause issues. A really strange problem I know, but pretty typical of my shop experiences so maybe just my problem...lol.

Anyway next step is the fence...
3/2/2010 8:13:28 PM
United States
Posted by:
Reply to comment from Benjamin who wrote:
...do you cut a dado for the second (right) runner?...

Hi Benjamin,
The right side does not get a dado.  I felt that positioning the dado would be too difficult, so I opted for placing the sled on the table with the left runner in place and then securing it from the front and rear without removing the sled.
The runner material I have is thinner than the depth of my miter sled.  Without a dado on the right, the runner does not bottom out in the miter slot.
Reply to comment from Benjamin who wrote:
...Do you shoot and edit these video's your self? I'm in the post-production world and I edit footage every day. These are well made videos! ...

Thank you Benjamin!  I am a one man show - film, edit, make sure my fly is zipped on camera.  Yep I do it all.  There's a lot I've learned about the video process in the last few years and hopefully the improvement from my earlier videos is apparent. I have recently switch editing software and I'm loving the new features!  I appreciate your compliments - especially since you're in this line of work.  I'm just fumbling my way through, so if you have any tips for me, please pass them along.
John
3/2/2010 8:03:31 PM
United States
Posted by:
Reply to comment from Jim who wrote:
John,

Thanks for all these! I did want to point out something.  ...slots dado marked as 5/16.
The actual measured and in the video is 3/16...


Hi Jim.  THANK  YOU for bringing that to my attention.  You are absolutely right, the 3/4 inch shallow dados in the bottom of the sled are supposed to be 3/16".  I'll try and find the time to update the Sketchup model and PDF.

John
3/2/2010 5:39:39 PM
Canada
Benjamin
Posted by:
Hi John. Great web site. I've been watching all the video and their great!

Two questions;

1) I know you answered Paul Wash's question, but I think the question still remains... do you cut a dado for the second (right) runner? I assume you'd have to so the sled rest flush with the saw top. What depth (5/16"?) did you cut the dado for the left and the right runners?

2) Do you shoot and edit these video's your self? I'm in the post-production world and I edit footage every day. These are well made videos!

Thanks John. Please keep it up!
~Benjamin
2/27/2010 12:14:02 AM
United States
Jim
Posted by:
John,

Thanks for all these! I did want to point out something.  I was using the  PDFs and the sketchup file and I noticed you have the slots dado marked as 5/16.
The actual measured and in the video is 3/16.  I caught this before I plunged as I expect most people would..  but just an FYI...

And get going on finishing that pool table!

Jim
2/20/2010 3:38:40 AM
United States
Posted by:
Reply to comment from Paul Wash who wrote:
Hi John, is the second runner flush and not in a dado? If not, does that have any impact on the vert...

Hi Paul,
The runners are thin enough so that they don't contact the bottom of the miter slot.  The runner material is 1/4 inch thich, and my miter slot is 3/8.  The sled rests fully on the table saw top.
John
2/19/2010 3:08:21 PM
United States
Paul Wash
Posted by:
Hi John, is the second runner flush and not in a dado? If not, does that have any impact on the vertical 90 degrees of the blade to the sled? I am assuming the runners are thick enough (1/2 inch?) that they sit in the bottom of the miter and actually raise the sled slightly above the table. Thanks!
1/30/2010 8:47:55 AM
United States
Posted by:
Reply to comment from Ivan who wrote:
John great website.What material are you using for the rail at the back (the handle part)

Thanks Ivan.  The upright part of the handle and the rounded over parts are both red oak.  You can pretty much use any strong hardwood.
1/30/2010 3:37:38 AM
United States
Ivan
Posted by:
John great website.What material are you using for the rail at the back (the handle part)
1/28/2010 8:03:28 PM
United States
Posted by:
Reply to comment from John who wrote:
For the runners, what material (specific) did you use and where did you acquire it?...

John, the runner material is UHMV plastic.  I bought mine from Peachtree Woodworking.  The material is sold already sized to fit the standard 3/4 inch miter slot.
1/28/2010 7:59:50 PM
United States
Posted by:
Reply to comment from John who wrote:
Great video and well made sled!! Probably my next shop built jig project! I notice that you do not h...

Thanks John.  I actually do have a splitter installed when I use the fence.  I may have removed it to cut the initial slot in the new sled.  The splitter is a must have on a tablesaw in my opinion.  I would like to get a tablesaw where the riving knife goes up and down with the blade like the new Unisaw.  I am a ways away from a saw like that, but it does not hurt to daydream.
1/28/2010 1:16:31 PM
United States
John
Posted by:
Great video and well made sled!! Probably my next shop built jig project! I notice that you do not have a splitter set up with the super sled. Would you recommend one? I use one but am curious if it is neccessary. I also built a blade guard from some 1/4" acrylic. For the runners, what material (specific) did you use and where did you acquireit? Thanks for all you do!!

John
1/27/2010 6:59:03 PM
United States
Phil
Posted by:
Great video.  Actually all the videos on the site are very well done.  I dont have quite the ability to do some of the cool stuff that you have shown, but am trying to learn as fast as I can.  Keep it up.  Smile
1/23/2010 12:19:10 PM
United States
Posted by:
Reply to comment from John who wrote:
Hi John,

Thank you very much for an informative and well-put together video, plans and overall we...

I am glad you like the design of the super sled John.  Welcome to Eagle Lake, hope to you around.
John
1/23/2010 7:59:53 AM
Canada
John
Posted by:
Hi John,

Thank you very much for an informative and well-put together video, plans and overall website.  I stumbled across this site after doing some web searches on table saw sleds and this is definately the one that I will be building!  I have also bookmarked this site and intend visiting often.  Thanks!

John
12/14/2009 11:13:36 PM
Posted by:
Pingback from toolcrib.com

» 22 Free Crosscut Sled Plans: The Real Ultimate Guide to Cross Cut Sleds!  -  ToolCrib.com Blog
12/14/2009 12:00:01 AM
Posted by:
Pingback from woodworkforums.com

Sliding Compound Mitre Saw - Page 6 - Woodwork Forums
12/13/2009 9:09:47 PM
United States
Don
Posted by:
Can anyone comment ...

In the last two pics of this project, it appears the super sled glides onto an outfeed-type table. Is there any info on what that is at far side of the sled?
12/12/2009 2:05:24 PM
Posted by:
Pingback from routerforums.com

My ghetto fabulous miter gauge in the making... - Router Forums
12/8/2009 6:36:16 PM
Posted by:
Pingback from ncwoodworker.net

Table saw jig help? - North Carolina Woodworker
12/1/2009 5:54:36 PM
United States
Posted by:
Reply to comment from Ed Bernard who wrote:
John,Thank you very much for this.  I am a novice woodworker and am just beginning to make useful ji...

Hi Ed,

I'm glad you find this site useful.  Once you build a crosscut sled for your tablesaw, you'll wonder how you ever got along without one.  The supersled would make a nice foundation to make a new box joint jig.  You could devise an adjustable indexing piece that mounts on the main board of the supersled.

Best of luck with your woodworking ventures Ed!
John
12/1/2009 5:50:52 PM
United States
Posted by:
Reply to comment from John R who wrote:
so my question is, do you just push the sled through, cutting through the front piece and the fence and handle in one go? ...

Hi John,

It would probably kick if you pull the sled towards you to cut the front part.  My best advice is to just do it a little at a time - maybe raise the blade a 1/4 of an inch at a time.  When you have a shallow kerf in the front bridge piece, you can stop your saw, pull the sled towards and then run it through from the front.  Know what I mean?
Thanks for your nice comment! I appreciate you stopping by Eagle Lake.
12/1/2009 5:04:44 PM
United States
Ed Bernard
Posted by:
John,
Thank you very much for this.  I am a novice woodworker and am just beginning to make useful jigs.  I've made a sacrificial fence jig that clamps to my rip fence very well and works fine as well as a finger joint jig that still doesn't work well after being re-made 4 times.  The fingers are always off a little at the extreme end, but I'm hopeful to get it right some day.  My next project was going to be a crosscut sled because I really need one, and the various styles (left or right miter slot, back or front cross-support, etc) was really confusing me as to which was the best.  I suspect that my wife will be getting me an Incra miter guage for Christmas, but I still need the sled and yours looks perfect, AND, I think I have the confidence to make one.  Your videos are great, and I like the design as well as the way you tell folks how to make one.  Thanks again.  You will never know how much this will make my life easier.  All my best wishes.

Ed

Add comment


(Will show your Gravatar icon)

  Country flag

biuquotereply
  • Comment
  • Preview
Loading


Email Notifications

Add your email address to the video notification list:
We have created this privacy policy to demonstrate our firm commitment to your privacy and the protection of your information.

Our email is permission based. If you receive a mailing from us, our records indicate that (a) you have expressly shared this address for the purpose of receiving information in the future ("opt-in"), or (b) you have registered or purchased or otherwise have an existing relationship with us. We respect your time and attention by controlling the frequency of our mailings. If you believe you have received unwanted, unsolicited email sent via this system or purporting to be sent via this system, please forward a copy of that email with your comments to abuse@constantcontact.com for review.

How can you stop receiving email from us? Each email sent contains an easy, automated way for you to cease receiving email from us, or to change your expressed interests. If you wish to do this, simply follow the instruction at the end of any email.

How we protect your privacy We use appropriate security measures to protect against the loss, misuse and alteration of data used by our system. Sharing and Usage We will never share, sell, or rent individual personal information with anyone for their promotional use without your advance permission or unless ordered by a court of law. Information submitted to us is only available to employees managing this information for purposes of contacting you or sending you emails based on your request for information, and to contracted service providers for purposes of providing services relating to our communications with you.

Use of Web Beacons When we send you emails, we may include a web beacon to allow us to determine the number of people who open our emails. When you click on a link in an email, we may record this individual response to allow us to customize our offerings to you. Web beacons collect only limited information, such as a cookie identifier, time and date of a page being viewed, and a description of the page on which the Web Beacon resides (the URL).

Web Beacons can be refused when delivered via email. If you do not wish to receive Web Beacons via email, you will need to disable HTML images or refuse HTML (select Text only) emails via your email software.

What's New?

RecentComments

Comment RSS
High Quality